Install Cacti (Network Monitoring) on Ubuntu Server


Cacti Required Packages

The Cacti required following packages to be installed on your Linux operating systems. I am using Ubuntu Server.

1. Update Ubuntu

sudo apt-get install update

2. Required Packages for Cacti

sudo apt-get install -y apache2 php5 php5-mysql php5-snmp php5-gd libapache2-mod-php5 mysql-server rrdtool

3. SNMP and SNMPd

sudo apt-get -y install snmp snmpd

4. Installation of Cacti

sudo apt-get -y install cacti cacti-spine

we need to start the snmpd service.

sudo /etc/init.d/snmpd start

Now you can access http://ip-of-you-server/cacti after installation, the first login, the default account and password are “admin”.

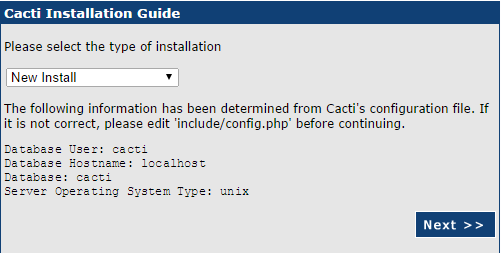
Select new install and click Next

If everything is green, which it should be if you followed all the steps, click Next.

Login with user name admin & password admin .. next screen prompt you to change password…

to be continued ….

Mikrotik Router Board 750Gr3


hEX is a five port Gigabit Ethernet router for locations where wireless connectivity is not required. The device has a full size USB port. This new updated revision of the hEX brings several improvements in performance.
It is affordable, small and easy to use, but at the same time comes with a very powerful dual core 880MHz CPU and 256MB RAM, capable of all the advanced configurations that RouterOS supports.
IPsec Hardware encryption (~470Mbps) and dude server package is supported, microSD slot on it also provides improved r/w speed for database storage on microSD card.

RB750Gr3

RB750Gr3


I am currently using for load balance and performance is excellent.


Best Regard’s
Abubaker Siddiq Lasania
Virtual IT Support

Join in @ Page / Group

“Hash sum mismatch” error Ubuntu


When I check for updates, I get a “Failed To Download Repository Information” error.

Just remove all the content of /var/lib/apt/lists directory:

sudo rm -rf /var/lib/apt/lists/*

then run:

sudo apt-get update

Best Regard’s
Abubaker Siddiq Lasania
Virtual IT Support

Join in @ Page / Group

Mikrotik NOIP update script


##############Script Settings##################

:local NOIPUser "username"
:local NOIPPass "password"
:local WANInter "ether1"

###############################################

:local NOIPDomain "noiphostmane"

###############################################


:local IpCurrent [:resolve myip.opendns.com server=208.67.222.222];
:put $IpCurrent

:if ([:resolve $NOIPDomain] != $IpCurrent) do={
      /tool fetch mode=http user=$NOIPUser password=$NOIPPass url="http://dynupdate.no-ip.com/nic/update\3Fhostname=$NOIPDomain&myip=$Ipcurrent" keep-result=no
      :log info "NO-IP Update: $NOIPDomain - $IpCurrent"
}

Script for Mikrotik Terminal

/system script
add name=noipupdate source="##############Script Settings###############\
    ###\r\
    \n\r\
    \n:local NOIPUser \"username\"\r\
    \n:local NOIPPass \"password\"\r\
    \n:local WANInter \"ether1\"\r\
    \n\r\
    \n###############################################\r\
    \n\r\
    \n:local NOIPDomain \"noiphostname\"\r\
    \n\r\
    \n:local IpCurrent [:resolve myip.opendns.com server=208.67.222.222];\r\
    \n:put \$IpCurrent\r\
    \n\r\
    \n:if ([:resolve \$NOIPDomain] != \$IpCurrent) do={\r\
    \n      /tool fetch mode=http user=\$NOIPUser password=\$NOIPPass url=\"http://dynupdate.no-ip.com/nic/update\\3Fhostname=\$NOIPDomain&myip=\$Ipcurrent\" \
    keep-result=no\r\
    \n      :log info \"NO-IP Update: \$NOIPDomain - \$IpCurrent\"\r\
    \n}\r\
    \n\r\
    \n"

Now create schedule to run noipupdate min update time 6min. Below 6Min update may be ban your hostname

Best Regard’s
Abubaker Siddiq Lasania
Virtual IT Support

Join in @ Page / Group

Dynamic DNS Update Script for NO-IP behind NAT on Mikrotik Router V2


Dynamic DNS Update Script for NO-IP behind NAT on Mikrotik Router V2

Mikrotik Script format direct paste into script section


#Dynamic DNS Update Script for No-IP DNS behind nat
# Set needed variables
:local username "your no-ip user login"
:local password "your no-ip password"
:local host "your no-ip host name"
:global previousIP
# print some debug info
:log info ("Update No-IP DNS: username = $username")
:log info ("Update No-IP DNS: hostname = $host")
:log info ("Update No-IP DNS: previousIP = $previousIP")
#
# behind nat - get the public address using dyndns url http://checkip.dyndns.org
/tool fetch mode=http address="checkip.dyndns.org" src-path="/" dst-path="/dyndns.checkip.html"
:delay 2
:local result [/file get dyndns.checkip.html contents]
:log info "dyndns result = $result"
# parse the current IP result
:local resultLen [:len $result]
:local startLoc [:find $result ": " -1]
:set startLoc ($startLoc + 2)
:local endLoc [:find $result "</body>" -1]
:local currentIP [pick $result $startLoc $endLoc]
:log info "No-IP DNS: currentIP = $currentIP"
:if ($currentIP != $previousIP) do={
:log info "No-IP: Current IP $currentIP is not equal to previous IP, update needed"
:set previousIP $currentIP
:local url "http://dynupdate.no-ip.com/nic/update/?myip=$currentIP&hostname=$host"
:log info "No-IP DNS: Sending update for $host"
/tool fetch url=$url user=$username password=$password mode=http dst-path=("no-ip_ddns_update.txt")
:log info "No-IP DNS: Host $host updated on No-IP with IP $currentIP"
:delay 2
:local result [/file get "no-ip_ddns_update.txt" contents]
:log info "Update Result = $result"
} else={
:log info "No-IP: update not needed "
}
# end

Mikrotik Terminal Export Format

/system script
add name=noip_ddns policy="read,write,policy" source="#Dynamic DNS Update Script for No-IP DNS beh\
    ind nat\r\
    \n# Set needed variables\r\
    \n:local username \"your no-ip user login\"\r\
    \n:local password \"your no-ip password\"\r\
    \n:local host \"your no-ip host name\"\r\
    \n:global previousIP\r\
    \n# print some debug info\r\
    \n:log info (\"Update No-IP DNS: username = \$username\")\r\
    \n:log info (\"Update No-IP DNS: hostname = \$host\")\r\
    \n:log info (\"Update No-IP DNS: previousIP = \$previousIP\")\r\
    \n#\r\
    \n# behind nat - get the public address using dyndns url http://checkip.dyndns.org\r\
    \n/tool fetch mode=http address=\"checkip.dyndns.org\" src-path=\"/\" dst-path=\"/dyndns.checkip.html\"\r\
    \n:delay 2\r\
    \n:local result [/file get dyndns.checkip.html contents]\r\
    \n:log info \"dyndns result = \$result\"\r\
    \n# parse the current IP result\r\
    \n:local resultLen [:len \$result]\r\
    \n:local startLoc [:find \$result \": \" -1]\r\
    \n:set startLoc (\$startLoc + 2)\r\
    \n:local endLoc [:find \$result \"</body>\" -1]\r\
    \n:local currentIP [pick \$result \$startLoc \$endLoc]\r\
    \n:log info \"No-IP DNS: currentIP = \$currentIP\"\r\
    \n:if (\$currentIP != \$previousIP) do={\r\
    \n:log info \"No-IP: Current IP \$currentIP is not equal to previous IP, update needed\"\r\
    \n:set previousIP \$currentIP\r\
    \n:local url \"http://dynupdate.no-ip.com/nic/update/\?myip=\$currentIP&hostname=\$host\"\r\
    \n:log info \"No-IP DNS: Sending update for \$host\"\r\
    \n/tool fetch url=\$url user=\$username password=\$password mode=http dst-path=(\"no-ip_ddns_update.txt\")\r\
    \n:log info \"No-IP DNS: Host \$host updated on No-IP with IP \$currentIP\"\r\
    \n:delay 2\r\
    \n:local result [/file get \"no-ip_ddns_update.txt\" contents]\r\
    \n:log info \"Update Result = \$result\"\r\
    \n} else={\r\
    \n:log info \"No-IP: update not needed \"\r\
    \n}\r\
    \n# end\r\

MUM – Pakistan Presentation


Opening and introduction, new products

WISP / Industrial Deployment Using Mikrotik CapsMan

Initial debugging steps in RouterOS

MikroTik Implementation in Enterprise Network

Mikrotik Wireless Products and Their Best Setups

MikroTik RouterOS & RouterBoard Wireless features overview


Best Regard’s
Abubaker Siddiq Lasania
Virtual IT Support

Join in @ Page / Group

MUM in review


MikroTik User Meeting (MUM) is a conference on MikroTik RouterOS software and RouterBoard hardware held 1st time in Karachi, Pakistan on 17th June 2016.

We All thanks to Mikrotik in this regard’s to give us a best way to introduces Pakistani Users and expert’s to present our love and experience toward’s there ROS & Hard wares.

Specially thanks to Dreams Network & Technology (Pvt) Ltd and also Shakeel Khan they work hard to managed the mum presentation in Pakistan.


Upcoming in Pakistan:

Stablisment of MikroTik Academy and Officially Certification Program.

Best Regard’s
Abubaker Siddiq Lasania
Virtual IT Support

Join in @ Page / Group


Backup By Gmail – Mikrotik


UPDATED on Apr/05/2016  ( few correction and add suggestions ( receiver email field)

Tested on # apr/03/2016 14:47:25 by RouterOS 6.34.4

Adding script into script section …
open new terminal and copy bellow lines

/system script
add name=BackupEmail source="# Enter Sender/Receiver Details.\r\
    \n\r\
    \n:global gmailuser  GMAILUSERNAME\r\
    \n:global gmailid  YOUREMAILID@gmail.com\r\
    \n:global gmailpwd  YOURCURRENTPASSWORD\r\
    \n\r\
    \n## --- Do not change below ---- ##\r\
    \n\r\
    \n\r\
    \n# Enter Receiver  Details.\r\
    \n:global recmail RECEIVEREMAILADDRESS\r\
    \n\r\
    \n## --- Do not change below ---- ##\r\
    \n\r\
    \n#:log warning \"Mikrotik Router Backup JOB Started . . . \"\r\
    \n:local gmailip\r\
    \n:set gmailip [:resolve \"smtp.gmail.com\"]\r\
    \n:global backupfile configbackup\r\
    \n:global mikrotikexport mtexport_backup\r\
    \n:global sub1 ([/system identity get name])\r\
    \n:global sub2 ([/system clock get time])\r\
    \n:global sub3 ([/system clock get date])\r\
    \n:log warning \"Creating new up to date backup files . . . \"\r\
    \n\r\
    \n/system backup save dont-encrypt=yes name=\$backupfile\r\
    \n/export compact file=\$mikrotikexport\r\
    \n\r\
    \n/tool e-mail set address=\$gmailip from=\$gmailid password=\$gmailpwd port=587 start-tls=yes user=\$gmailuser\r\
    \n\r\
    \n:log warning \"Backup process pausing for 10s so it can complete creating backup if system is busy ...\"\r\
    \n:delay 10s\r\
    \n:log info \"Start Sending Backup File via Email using GMAIL SMTP . . .\"\r\
    \n/tool e-mail send to=\$recmail password=\$gmailpwd subject=\"\$sub3 \$sub2 \$sub1 Configuration BACKUP File\" from=\$gmailid file=\$backupfile server=\$gmailip start-tls=yes\r\
    \n:delay 30s\r\
    \n/tool e-mail send to=\$gmailid password=\$gmailpwd subject=\"\$sub3 \$sub2 \$sub1 Configuration EXPORT File\" from=\$gmailid file=\$mikrotikexport server=\$gmailip start-tls=yes\r\
    \n# Delete Old backup files to save space.\r\
    \n/file remove \$backupfile\r\
    \n:delay 30s\r\
    \n/file remove \$mikrotikexport\r\
    \n/tool e-mail set address=0.0.0.0 from=<> password=xxxx port=25 start-tls=yes user=yourid\r\
    \n:log warning \"Backup Finished & Backup File Removed. All Done. You should verify your inbox for confirmation\""

Now add Schedule to run every night 12:05 AM

/system scheduler
add interval=1d name=BackupByEmail on-event=BackupEmail start-date=apr/03/2016 start-time=00:05:00

Now it’s time to edit script and change some needed information about your GMAIL account

gmailuser GMAILUSERNAME
gmailid YOUREMAILID@gmail.com
global gmailpwd YOURCURRENTPASSWORD

New Field Edit
global recmail RECEIVEREMAILADDRESS

Best Regard’s
Abubaker Siddiq Lasania
Virtual IT Support

Join in @ Page / Group

2 Wan Load Balance

2 Wan Dynamic Dhcp-Client Load Balance


Mikrotik Dynamic Dhcp-Client Load balance script.

Kindly do change the following as mention below.

ether1 = ether1-gateway
ether2 = ether2-gateway
ether3 = ether3

Ether3 is a Lan Interface you can rename after complete 7 steps .

Step 1.
Add dynamic client on ether1 & ether2 (WAN1 & WAN2)

/ip dhcp-client
add add-default-route=no dhcp-options=hostname,clientid disabled=no interface=ether1-gateway use-peer-dns=no use-peer-ntp=no
add add-default-route=no dhcp-options=hostname,clientid disabled=no interface=ether2-gateway use-peer-dns=no use-peer-ntp=no

Step 2: Add Lan Interface IP . ( ether3 )

/ip address
add address=192.168.88.1/24 interface=ether3 network=192.168.88.0

Step 3: Add Firewall Nat rule.

/ip firewall nat
add action=masquerade chain=srcnat out-interface=ether1-gateway
add action=masquerade chain=srcnat out-interface=ether2-gateway

Step 4:  Add firewall Mangle Rules

/ip firewall mangle
add action=mark-connection chain=prerouting comment="Load Balance" connection-state=new in-interface=ether1-gateway new-connection-mark=ether1_conn
add action=mark-connection chain=prerouting connection-state=new in-interface=ether2-gateway new-connection-mark=ether2_conn
add action=mark-routing chain=output connection-mark=ether1_conn new-routing-mark=to_ether1
add action=mark-routing chain=output connection-mark=ether2_conn new-routing-mark=to_ether2
add action=mark-connection chain=prerouting connection-state=new dst-address-type=!local in-interface=ether3 new-connection-mark=ether1_conn per-connection-classifier=both-ports:2/0
add action=mark-connection chain=prerouting connection-state=new dst-address-type=!local in-interface=ether3 new-connection-mark=ether2_conn per-connection-classifier=both-ports:2/1
add action=mark-routing chain=prerouting connection-mark=ether1_conn in-interface=ether3 new-routing-mark=to_ether1
add action=mark-routing chain=prerouting connection-mark=ether2_conn in-interface=ether3 new-routing-mark=to_ether2

Step 5: Add Routes ( Setting temporary  gateway)

/ip route
add check-gateway=ping comment="Ether1-Wan routing gateway" distance=1 gateway=192.168.0.1 routing-mark=to_ether1
add check-gateway=ping comment="Ether2-Wan routing gateway" distance=1 gateway=192.168.1.1 routing-mark=to_ether2
add comment=Ether1-Wan distance=1 gateway=192.168.0.1
add comment=Ether2-Wan distance=2 gateway=192.168.1.1

step 6: Create New Script with name ChangeGateways and copy below lines.

:global newgw [/ip dhcp-client get [find interface="ether1-gateway" ] gateway ]
:global activegw [/ip route get [/ip route find comment="Ether1-Wan"] gateway ]
:if ($newgw != $activegw) do={
/ip route set [find comment="Ether1-Wan"] gateway=$newgw
/ip route set [find comment="Ether1-Wan routing gateway"] gateway=$newgw
}
:global newgw [/ip dhcp-client get [find interface="ether2-gateway" ] gateway ]
:global activegw [/ip route get [/ip route find comment="Ether2-Wan"] gateway ]
:if ($newgw != $activegw) do={
/ip route set [find comment="Ether2-Wan"] gateway=$newgw
/ip route set [find comment="Ether2-Wan routing gateway"] gateway=$newgw
}

Step 7: Final Step.

Now add schedule to run this script with 2 seconds timmer ..

Best Regard’s
Abubaker Siddiq Lasania
Virtual IT Support

Join in @ Page / Group